Monday, August 27, 2012

Cozy Nook

Good Morning!  I hope you had a nice weekend.  Ours was spent in Maine celebrating my Grandmother's 90th birthday....Happy Birthday GiGi!  I only hope to be as lucky as she one day and be able to see my children and my children's children all together.  I think my favorite part of the whole weekend was sharing stories by the campfire.  Just a little good old fashioned fun...no tvs, computers or phones to get in the way and steal our attention.   Just the crackle of the fire and hum of our voices.  A perfect little getaway before it was back to reality this week. 

So, I thought I would kick off the week with another project that we did while I was pregnant.  (I did a lot of pinterest and blog surfing to feed my DIY cravings while I was with-child).  One day I came across an adorable picture of a reading nook and just had to find a way to create one in our house.  I envisioned the kiddos all nestled in amongst fluffy pillows with books and flashlights.  After a bit more pinterest surfing I decided that the perfect place would be in the toy room, where I gave the china cabinet a makeover and turned it into a toychest.  Since most of the time it looked like the picture on the left, instead of the picture on the right...I decided it was time for it to go.  


And just for fun, a step further back to see what it used to look like before the first makeover:


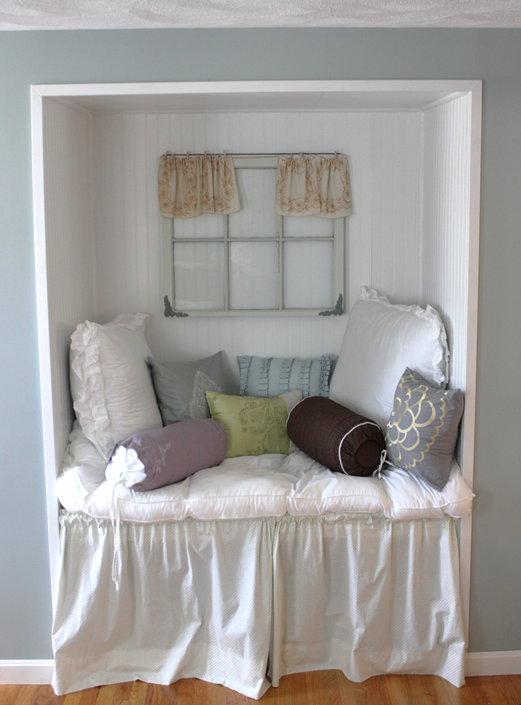
A bit of demolition, framing and lots of beadboard later (admittedly I have a not-so-secret love for beadboarding) we now have a cozy nook of our own...


  ...Come on in...relax, stay awhile.


Friday, August 24, 2012

Faux Capiz Shell Chandelier


Happy Friday!  Thought I’d share a little project I did back when I was pregnant with #2.  I was surfing around pinterest one day for DIY chandeliers.  (I’ve recently come to realize that I have a chandelier fetish…Some girls have shoes, bags or clothing fetishes…nope, not me.  I love chandeliers…can’t get enough of them.  I think I’d have one in every room of my house if I could…actually – we practically do come to think of it.)  I was looking for something to replace the lighting in my downstairs bath...
 

...and came across a great tutorial for a DIY capiz shell chandelier.  Guess what it’s made of?  WAX PAPER!  Yep, I almost fell out of my chair when I saw it.  Best part of this one too, no rewiring required. (Say that 5 times fast)  This is a great one to do when your prego…requires a lot of sitting, cutting, sewing and patience.  The first time I tried it I cut each individual circle out by hand.  It was a lot faster/easier with a circle cutter…probably cut the time in half actually.  But, it is not necessary to complete this project. 

1.       2 Boxes Wax Paper
2.       Iron
3.       Sewing Machine
4.       Scissors
5.       Old Lamp Shade
6.       Cup Hooks
7.       Muffin Tin

 Instructions:
     1.       Take your old lamp shade and cut the fabric off so you are left with just the skeleton.

2.       Take your wax paper, pull off 3 large pieces and iron together.  Set aside; pull off 3 more, iron.  Repeat until you have used all of the wax paper.

3.       Find a circular object (I used a candle votive) and start tracing.  Trace, trace trace trace.  (Here is where a circle cutter comes in handy – you can get them at JoAnn Fabrics for around $20 and you can skip this step.

4.       Start cutting…and cutting, and cutting

5.       Place circles in muffin tin.

6.       Sew circles together.  I sewed one long strand, and gave myself a few extra stitches every 18th circle…so I could cut them apart.

7.       Cut strands of 18 (or whatever length you desire).

8.       Hang strands over the edges of your skeleton lamp shade.

9.       Screw 3 or 4 cup hooks around your light source.

10.   Hang chandelier

11.   Enjoy!
 
Here's the lampshade I started with:
 
And this is a shot of one of the smaller strands...(thank you Vanna!)
 
 
And here's the end product....next to the old light fixture for full effect. 
And here's a shot of it with the light on:


Much better right?  Not bad I guess for about $9....I liked it enough to make 2...


Thursday, August 23, 2012

Stroll Down Memory Lane


Morning!  So, It occurred to me after I posted the “before and afters”  of the flower boxes yesterday, that I neglected to show you what it used to look like, before before…when we first moved in.  We’re talking tires, overgrown bushes…the works.  It only seems fair to give you the full view of what we were dealing with.  

So without further ado…Here is a shot of the side of the pool with full-brush coverage (where we've ultimately rearranged the fence).  You wouldn't know it from this picture, but once fall comes - all of that lovely green goes away, and bam...huge condos hit you right in the face.  I'll show you what I mean in another month or so. 


And here is another angle of the pool area, showing off the lovely makeshift pool cover.  (Also, check out that blueberry blue  paint color on the house and pool shed!  More on that to come...stay tuned.)  

 
First on the chopping block was the brush that surrounded to pool to make room for the fence.  
 
 
Next we took off the pool cover...with the hope that a gorgeous pool lie underneath.....


 …Niiiice right? It’s just beckoning you to come in, sit by the pool. Relax….No? Not so much.  But, after a little TLC....


 Much better...anyone else hearing "It's five o'clock somewhere" ringing in your ears? 

 
*Update* If you are interested in making some flower boxes of your own, stay tuned for a full tutorial.

Wednesday, August 22, 2012

Fencing In

Good Morning to you...got your morning coffee?  I do...mmmm so good.  Coffee and a few before and after pics to start the day, what could be better than that?

We decided to rearrange our fence so that we could reclaim some space on our side yard and block out our neighbors in back.  Once all was said and done, there was still an odd space at the bottom of the fence that screamed for attention.  Enter flower boxes.  Since an 8-foot premade flower box (times 8) was out of our budget, we decided to make some of our own.   Some pressure treated wood, nails, a hammer, and some screening for the bottom was all it took to make these not-so-little beauties.    Here are the before and afters:


If you decide to make a few of these yourself, make sure you get flowers that are appropriate for the amount of sunlight you get.  These are all full-sun annuals and are very happy here because they get bright sunlight all day long.  Also, to save some cash on potting soil, we filled the bottom half of the boxes with empty water bottles, then covered those with moisture control potting soil.  This helps to cut down on watering.


We love how these turned out.  Amazing what a little color can bring into a space, right?  Ok off to feed the kiddos.  Have a great day! 


Tuesday, August 21, 2012

Baby Steps


Just over a year later, here I am again... Where did I go you wonder?  Well, a few life-changing events have taken place since my last post.  First my husband suffered a serious injury and subsequent blood clot.  It took the wind out of all of our sails.  Thankfully he is doing better…not completely healed yet, but on the road to recovery so to speak.  The second, and much happier event…we were blessed with our second child.  Needless to say it’s been busy around here and the blog needed to take a backburner for a bit.  I’m here today though to give it another shot.  Baby steps… bear with me, I’m going to be squeezing in projects and blogging still during naptimes – but this time ‘round it will be a bit more challenging with 2…key is to get them both to nap at the same time…here’s to that.  Wish me luck. 

Monday, July 11, 2011

Update - Tree, Pre-Makeover

Somehow, miraculously the before picture of the sand dollar tree appeared in my phone's picture catalog.  Here it is before it's makeover:


Check out the after picture a few posts below. 

Sunday, July 10, 2011

Sunroom Before and After Shots!

Finally, I've decided that for now, my sunroom makeover is complete.  At long last, here is my sunroom in its original state:


And here it is today:


Angle #2 before:


And Angle #2 After:


 Angle #3 Before:


And Angle #3 After:


And just a few more after shots, just becuase:


I searched and searched for a rug and have, at least at this point in time, given up.  Instead of an area rug, I may just get an entirely new indoor/outdoor rug to replace the current icky maroon-colored one that's in there.  I'm also always looking for interesting decorations to hang on the high walls.  I'll be sure to keep you posted on anything new I come up with out there.  For now however, I'm focusing on the pool area outdoors.  (Why not?  The weather is gorgeous!)  Stay tuned for some before and after pics!