Thursday, March 31, 2011

Picking Paint

A multitasker to a fault? (sigh) Yes, that's me. While working on my settee makeover, I'm also trying to pick out paint colors for the sunroom that will soon be its new home.  I am inspired by the monochromatic scheme in this picture I found, hosted by another blog:


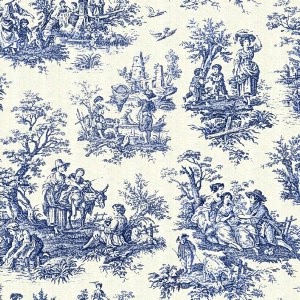
I'd like to get this same kind of look with the blue and white tones in the fabrics I've selected. Here's a shot of the paint swatches next to the Toile:

And here's a shot of the front runner in my paint selection thus far:


It's called Cincinnatian Hotel Lindner Blue from Valspar's National Trust for Historic Preservation collection. I'm off to Lowe's to pick up a sample.  I'll be putting it to the test on the walls this afternoon - stay tuned for the results...


Wednesday, March 30, 2011

China cabinet turned toy chest update

It dawned on me while I was jam-packing the little one's toys away in her toy chest that I haven't put anything in my new shelves yet.  They were just sitting there empty, screaming for something to be put on them.  And put things on them I did.  Here's a snapshot of what they look like now that they are accompanied by all of her toys:


And a view from the side:


It reminds me of a toy store display - much more inviting and practical too.  Now she can see all of her toys and point to the ones she wants to play with.   

Tuesday, March 29, 2011

Showing a little leg

I thought I'd give a sneak peek at the progress on my settee makeover:

I'm already loving how this project is turning out.  It's one that I've had to recruit the handywork and expertise of my fabulously talented mother and mother-in-law.  Stay tuned for the big reveal...

Monday, March 28, 2011

Fabric Finds

After some careful consideration and a lot of blog surfing for inspiration, I've decided upon a color scheme for my newfound treasure and sunroom makeover.  BLUE.  A color I've shied away from since we bought our home four years ago...why, you ask?  Well, here's a glimpse back at what our house looked like when we first purchased it:
 

And the master bedroom:


And the living room:


....And one of the spare bedrooms:


 Ah, yes that blueberry blue was everywhere, and enough blue to last me, well, four years.  I'm finally coming around and am ready to give it another chance.  I decided that for this particular project, upholstery fabric was a must, so I took full advantage of JoAnn fabrics' sale currently going on.  I've always loved toile, but have never had the opportunity to use it anywhere.  Well, I finally found the perfect place for it.  Here's a snapshot of the gorgeous fabric that will soon embrace the "new" old settee:


And here's a snapshot of the materials I'm using for the project as well as a few other fabrics I'll use for pillows and other accents in the sunroom makeover:


Check back in to see the after shots!


Thursday, March 24, 2011

A Treasure Hunt

I love to pop into consignment and antique shops every now and again to see if there are any hidden treasures just waiting to be found.  I ventured out this week to a few nearby, looking for a great deal on some old bar stools.  Well, I haven't found any that have fit the bill just yet, but I did stumble across something great along the way.  I've been seeing a lot of old furniture revamps on some of my favorite HGTV shows.  So, when I spotted this little gem hiding amongst old ash trays, lamps, and dishware, I was instantly intrigued.  It was in a room marked 50% off (music to my ears!).  I mustered up the nerve to ask if they'd take $60 for it (someone wise once told me, just ask - all they can say is no, or in this case - YES!) I'm certainly taking a risk on this one since its not your typical unscrew-staple-rescrew-type-deal, but I'm never one to shy away from a challenge.   Here is a picture of my newfound treasure:


The task at hand is to find some great fabric to reupholster this baby.  I'll also use a complimenting color to paint the wooded frame and legs to give it a whole new, updated look.  Here's a little before-and-after snack to hold you over:  I decided to paint the little desk in my kitchen/dining room to match all of my other freshly-painted white furniture in there.  Here it is before:

And here it is after a new paint job and some new hardware:


A closer look:


I think I'll find a cute chair to use with it - maybe something to contrast the white.  Total cost for this project $1.87. (I still have leftover white paint, I found the hardware at Home Depot for $1.87)

Monday, March 21, 2011

Wallpaper taste, Wrapping paper budget

I was inspired by another blog to redo my china cabinet (which now lives in the little one's playroom). I decided however that $350 a roll for wallpaper was a little out of my budget.  So, I found some pretty wrapping paper to use instead.  Here is the before picture (not a great one, apologies!) of my dated china cabinet:


Here it is after it's paint job:


  And here is my china cabinet now:


What's neat about this project is that I can easily change out the wrapping paper for different seasons, style, mood, etc. Total cost: $28.95 ($18.95 for wrapping paper, $10 for foam board ).   If you'd like to give this a try, here's how I did it:

1. Purchase a few rolls of wrapping paper.


 2. Purchase foam board (I used 10 boards from the dollar store).


3. Measure the inside of each shelf, and cut foam board to fit exactly.


4. Wrap paper around the foam board and secure with tape.


5. Place papered foam board into each shelf.
6. Step back, enjoy!

Thursday, March 17, 2011

Stool Makeover

It took me a little longer than expected to find a fabric to cover the stools I rescued from the garage.  I haven't been all too impressed with the local fabric store so I went hunting around in some unusual places to find a good deal on something that could double as a fabric cover.  Well, a little extra searching paid off.  I stumbled upon these really pretty towels (pictured below) at Target for $9.99 a piece.  I figured since one towel could cover both stools it was a pretty good deal (not a great deal, but pretty good).  Here is another peek at the stools before their makeover:


And here they are after:


Here's a shot of the stools pushed in:


And a closer look at the fabric:


I really like the spring-like feeling these stools bring to the dining room.  They are so soft and inviting - exactly what I was hoping for.  If you would like to try this on your own, here's how:

1. Find a great fabric (and don't forget to look in all of the "unusual" places).


2. Unscrew the seats of the stools and remove old fabric. (check out the new Vanna White!)


3. Pin old fabric to new fabric, and cut out the pattern.


4. Use a staple gun to attach new fabric.


5. Screw on new seat cushion.
6. For a fresh look, give your stools some white paint.
7. Stand back, and enjoy!