Thursday, August 30, 2012

Family Room Makeover #2

 
Ready for Family Room Makeover #2? (Feeling a bit like Emily Henderson this morning)  OK, lets start from the beginning and work our way through the changes:


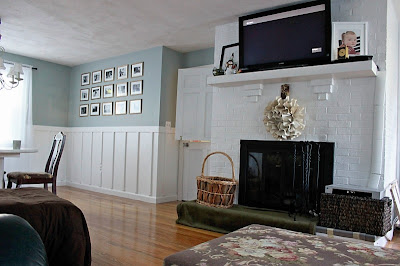
Getting better right?  Well, a lot brighter anyway.  Replaced the dark, heavy curtains for light and breezy sheers and decided to board and batten the walls to give the room more architectural interest. I. LOVE. IT. I had seen a lot of it on pinterest (honestly, what can't you find on pinterest these days) and decided to give it a try. It not only brightens the room, but it also makes it look so much bigger. We also painted the walls Benjamin Moore "Sea Glass." 
 
OK lets take a look at the progression from the other side of the room:


And let's take a look closer at the side of the room which now holds the picture gallery wall...
 
(psst...don't worry guys, the bar is out in the sunroom)


(I think I'm going to paint these three chairs a soft green to match the chandelier)


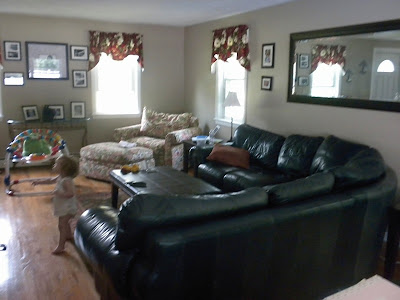
Fom this angle, if you turn around, this is what you see. (I'm trying to find "kid-friendly vignettes." Is there even such a thing? I'd love to put something on my end tables and tray on the ottoman...but have yet to find something that will fit the bill.  Any ideas?)
 
 
So if you turn your head from this angle, you will see the sconces.  I am contemplating painting these white, along with the big mirror, to soften the look a bit.  Stay tuned for those updates. 
 
 
So there you have it.  Funny how your tastes can change...One day I'll probably say to myself, what in the world was I thinking?  Hopefully not anytime soon.  For now anyway I am really happy with the results. 
 
Note: There are many projects that I have done within this makeover that I will focus more on in future posts, and will also give a step by step tutorial on how to hang board and batten.  Hope you enjoyed the makeover - have a great day!


Wednesday, August 29, 2012

Family Room Makeover #1

Good Morning! This next before and after segment is going to be a two-part series. Today I’m going to be showing you the before and after pics of our family room from when we first moved in, and the first paint job/makeover. Tomorrow I’ll show you what it looks like today (still a work in progress…but much improved I think.)

It’s been 4 years and I finally think I’ve figured out what my “style” is. I really like vintage cottage and farmhouse themes and color schemes and am drawn to rooms that give you that relaxed, airy feeling when you walk into them. So hopefully that is the same “vibe” you get when you see them too…

But First, Lets take a look around and see where we started. 

 
 Family Room Before:

 
Family Room After, makeover #1 
 
 
Before Angle #2:
 
 
After, Angle #2: 
 
 
Before, Angle #3: 

 
After, Angle #3:


As you can see I chose beige for the walls….a true indicator that at the time I had no clue what my style was or what direction to go in with the room. (It was Sherwin Williams "Balanced Beige")  I did however know that I wanted to brighten up the space and bring it into this century by painting all of the baseboards and window trim bright white. I used “Extra White” by Sherwin Williams. It took me 2 coats of oil-based primer and 2 coats of paint to get it to look like this.

I also decided to paint the brick on our fireplace in the family room. I went back and forth on that for a long time before finally taking the plunge…and am so glad that I did. 

Fireplace before:

 
Fireplace after:


Big difference right?  It feels much cleaner and makes the whole room look a lot brighter. 
Stay tuned for tomorrow’s after, after shots when I give this room a cottage chic update! 

Tuesday, August 28, 2012

Decorating a Mirror


Today I’ve got a really fun and rather quick project you can do. I had been admiring a gorgeous book page wreath on one of my “daily reads” over at Jones Design Company. I was more than delighted to discover that not only did she make it herself, but she also gave a tutorial on how to make one of my own. 


We desperately needed something to hang on the large mirror in our living room to block out the reflection of the TV. (Tip: if you plan to hang a mirror somewhere, be sure to take into account what is going to be reflected in it…you may decide you don’t like what you see.) So, I gave the tutorial a try and am so glad I did!


All you need for this project is a wreath frame, a hot glue gun, an old book, and a bit of fabric.

First, rip out the pages of a book.


Next, fold the paper like an accordian, back and forth, and pinch one end, leaving the other side to curl.


Put a dot of glue on the folded end and apply to the back of your wreath frame.  Repeat steps one and two until you have made it all the way around what will be the back of your frame.  Now flip the frame over and start on the front.  Keep folding, gluing and applying round and round until you have a full wreath.  You may need to squeeze some in at the end where there are gaps.


I love how this wreath adds texture and interest to the room.  Give it a try, I'd love to see your results!


Monday, August 27, 2012

Cozy Nook

Good Morning!  I hope you had a nice weekend.  Ours was spent in Maine celebrating my Grandmother's 90th birthday....Happy Birthday GiGi!  I only hope to be as lucky as she one day and be able to see my children and my children's children all together.  I think my favorite part of the whole weekend was sharing stories by the campfire.  Just a little good old fashioned fun...no tvs, computers or phones to get in the way and steal our attention.   Just the crackle of the fire and hum of our voices.  A perfect little getaway before it was back to reality this week. 

So, I thought I would kick off the week with another project that we did while I was pregnant.  (I did a lot of pinterest and blog surfing to feed my DIY cravings while I was with-child).  One day I came across an adorable picture of a reading nook and just had to find a way to create one in our house.  I envisioned the kiddos all nestled in amongst fluffy pillows with books and flashlights.  After a bit more pinterest surfing I decided that the perfect place would be in the toy room, where I gave the china cabinet a makeover and turned it into a toychest.  Since most of the time it looked like the picture on the left, instead of the picture on the right...I decided it was time for it to go.  


And just for fun, a step further back to see what it used to look like before the first makeover:


A bit of demolition, framing and lots of beadboard later (admittedly I have a not-so-secret love for beadboarding) we now have a cozy nook of our own...


  ...Come on in...relax, stay awhile.


Friday, August 24, 2012

Faux Capiz Shell Chandelier


Happy Friday!  Thought I’d share a little project I did back when I was pregnant with #2.  I was surfing around pinterest one day for DIY chandeliers.  (I’ve recently come to realize that I have a chandelier fetish…Some girls have shoes, bags or clothing fetishes…nope, not me.  I love chandeliers…can’t get enough of them.  I think I’d have one in every room of my house if I could…actually – we practically do come to think of it.)  I was looking for something to replace the lighting in my downstairs bath...
 

...and came across a great tutorial for a DIY capiz shell chandelier.  Guess what it’s made of?  WAX PAPER!  Yep, I almost fell out of my chair when I saw it.  Best part of this one too, no rewiring required. (Say that 5 times fast)  This is a great one to do when your prego…requires a lot of sitting, cutting, sewing and patience.  The first time I tried it I cut each individual circle out by hand.  It was a lot faster/easier with a circle cutter…probably cut the time in half actually.  But, it is not necessary to complete this project. 

1.       2 Boxes Wax Paper
2.       Iron
3.       Sewing Machine
4.       Scissors
5.       Old Lamp Shade
6.       Cup Hooks
7.       Muffin Tin

 Instructions:
     1.       Take your old lamp shade and cut the fabric off so you are left with just the skeleton.

2.       Take your wax paper, pull off 3 large pieces and iron together.  Set aside; pull off 3 more, iron.  Repeat until you have used all of the wax paper.

3.       Find a circular object (I used a candle votive) and start tracing.  Trace, trace trace trace.  (Here is where a circle cutter comes in handy – you can get them at JoAnn Fabrics for around $20 and you can skip this step.

4.       Start cutting…and cutting, and cutting

5.       Place circles in muffin tin.

6.       Sew circles together.  I sewed one long strand, and gave myself a few extra stitches every 18th circle…so I could cut them apart.

7.       Cut strands of 18 (or whatever length you desire).

8.       Hang strands over the edges of your skeleton lamp shade.

9.       Screw 3 or 4 cup hooks around your light source.

10.   Hang chandelier

11.   Enjoy!
 
Here's the lampshade I started with:
 
And this is a shot of one of the smaller strands...(thank you Vanna!)
 
 
And here's the end product....next to the old light fixture for full effect. 
And here's a shot of it with the light on:


Much better right?  Not bad I guess for about $9....I liked it enough to make 2...


Thursday, August 23, 2012

Stroll Down Memory Lane


Morning!  So, It occurred to me after I posted the “before and afters”  of the flower boxes yesterday, that I neglected to show you what it used to look like, before before…when we first moved in.  We’re talking tires, overgrown bushes…the works.  It only seems fair to give you the full view of what we were dealing with.  

So without further ado…Here is a shot of the side of the pool with full-brush coverage (where we've ultimately rearranged the fence).  You wouldn't know it from this picture, but once fall comes - all of that lovely green goes away, and bam...huge condos hit you right in the face.  I'll show you what I mean in another month or so. 


And here is another angle of the pool area, showing off the lovely makeshift pool cover.  (Also, check out that blueberry blue  paint color on the house and pool shed!  More on that to come...stay tuned.)  

 
First on the chopping block was the brush that surrounded to pool to make room for the fence.  
 
 
Next we took off the pool cover...with the hope that a gorgeous pool lie underneath.....


 …Niiiice right? It’s just beckoning you to come in, sit by the pool. Relax….No? Not so much.  But, after a little TLC....


 Much better...anyone else hearing "It's five o'clock somewhere" ringing in your ears? 

 
*Update* If you are interested in making some flower boxes of your own, stay tuned for a full tutorial.